Table of Contents
Let's be honest - getting passport photos taken at a studio or pharmacy is a rip-off. You walk in, stand against a backdrop for 10 seconds, and they charge you $10 to $15 for something you could easily do at home with your phone.
I've been there. I once paid $14.99 at a drugstore for two tiny photos, and one of them wasn't even properly centered. That frustration is exactly why I built VisaPicPro - a browser-based passport photo maker with one standard daily download and optional HD or print-ready Pro exports.
In this guide, I'll walk you through the entire process of making passport photos at home - from taking the right shot with your phone to printing them on A4 paper. It takes about 10 minutes, and you'll end up with photos that meet official government requirements for any country.
Why Make Passport Photos at Home?
There are a few very good reasons more and more people are skipping the photo studio entirely:
Save $10-15 Every Time
CVS charges $16.99, Walgreens $16.99, Walmart $7.44. At home? Free. You just need paper if you're printing.
Save 30-60 Minutes
No driving, no waiting in line, no coming back because they're "busy." Do it in your living room in 10 minutes.
Unlimited Retakes
Don't like how you look? Take another one. At a store, you get what you get - and retakes often cost extra.
Complete Privacy
VisaPicPro processes everything in your browser. Your photos never leave your device - no uploads to any server.
And here's the thing most people don't realize: there's no legal requirement to get passport photos from a professional studio. As long as your photo meets the official specifications (size, background, expression), it doesn't matter if it was taken at a studio or in your kitchen.
What You Need Before Starting
You probably already have everything. Here's the full checklist:
Any phone made in the last 5 years works fine. Use the rear camera - it's higher quality than the selfie camera.
A blank white wall is ideal. No patterns, no posters, no shelves visible behind you. A white bedsheet taped to the wall works in a pinch.
Natural daylight is best. Face a window so the light falls evenly on your face. Avoid overhead lighting - it creates harsh shadows under your nose and eyes.
It's much easier if someone takes the photo for you. If you're alone, use a tripod or prop your phone and set a 3-5 second timer.
Optional - only needed if you need physical prints. Any inkjet printer with glossy photo paper works. You can also take the digital file to a print shop.
Pro Tip: Don't have a white wall? No problem. Take your photo against any clean background and use VisaPicPro's free Background Remover to replace it with solid white. Works like magic.
Take the Right Photo
This is the most important step. A good source photo makes everything else easier. Here's exactly how to do it:
Camera Settings
- - Use your phone's rear camera - it's sharper than the front camera and doesn't distort facial features
- - Turn off beauty mode, filters, and HDR - you need a natural, unprocessed image
- - Set resolution to the highest available - more pixels means better cropping options
- - Turn off the flash - it creates shiny spots on your face and uneven lighting
Positioning
- - Stand about 4-6 feet from the camera (arm's length won't work)
- - Position yourself 6 inches in front of the white wall - too close creates shadows behind your head
- - Frame from the chest up - VisaPicPro will crop to the exact size, but it needs some space around your head
- - Hold the camera at eye level - not looking up or down
Expression & Appearance
- - Neutral expression - mouth closed, both eyes open, looking directly at the camera
- - No glasses - most countries (including the US since 2016) don't allow glasses in passport photos
- - No hats or headwear - unless for religious reasons (which most countries allow)
- - Hair away from your face - both ears should be visible if possible
Important: Take 5-10 photos and pick the best one. Check for shadows on your face, closed eyes, and make sure the background looks clean and even. Spending an extra minute here saves you from re-doing everything later.
Upload to VisaPicPro
Now that you have a good photo, head over to VisaPicPro.com. Here's what the interface looks like:
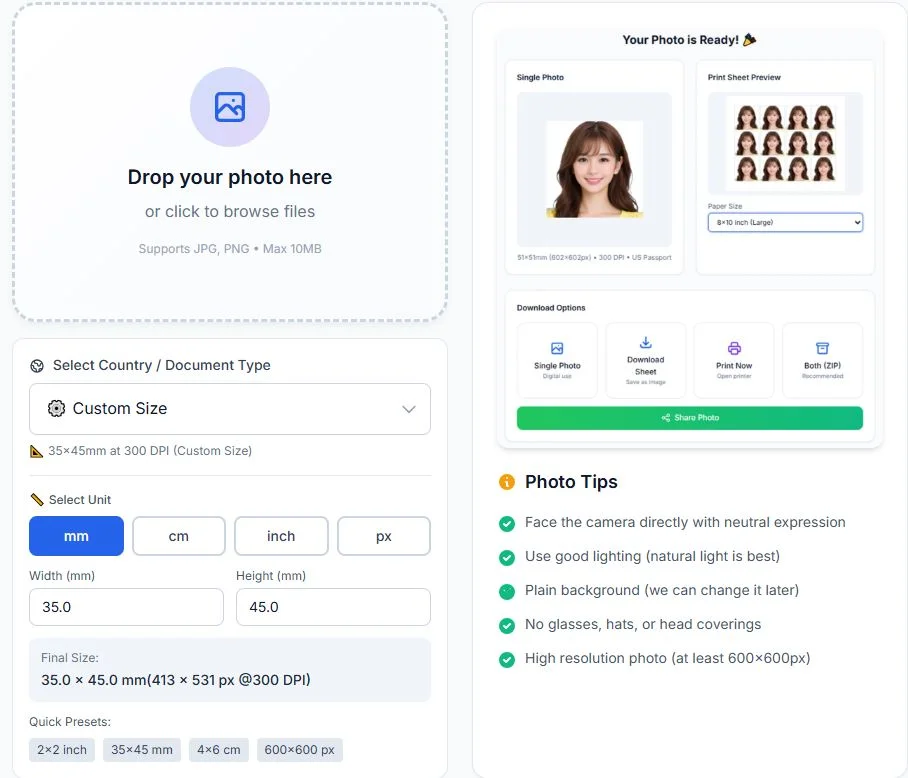
Here's what to do:
- 1 Select your country from the dropdown. VisaPicPro supports 50+ countries with exact size specifications - US (2 x 2 inch), UK (35 x 45mm), India (2 x 2 inch), Schengen (35 x 45mm), and many more.
- 2 Upload your photo by clicking the upload area or dragging and dropping your image. Supports JPG, PNG, and WebP formats.
- 3 Wait a few seconds - the AI detects your face, positions it correctly within the frame, and checks the photo against official requirements.
Pro Tip: If you're making photos for a family, just process each person's photo one at a time. There's no limit on how many photos you can create - use it as many times as you want.
Adjust and Verify Compliance
After uploading, VisaPicPro's AI engine does the heavy lifting. But it's always good to double-check a few things:
The AI locates your face and positions it precisely according to your country's requirements. For US passports, the head (from chin to top) must measure 1-1 inches in the final print.
The photo is cropped to the exact dimensions required - 2 x 2 inches for US, 35 x 45mm for UK/EU, and so on. No manual measuring needed.
A visual overlay shows you exactly where your eyes, chin, and crown should be. If something looks off, you can adjust the crop manually using the built-in crop tool.
The tool verifies your background is clean and uniform. If you need to change or clean up the background, use the integrated Background Remover.
If you need to fine-tune the crop position, click the crop icon and drag to adjust. The overlay guidelines will help you get perfect placement. But honestly, the AI nails it about 95% of the time - most people don't need to touch anything.
Download and Print on A4 Paper
Once you're happy with how the photo looks, it's time to download. VisaPicPro gives you two options:
Single Photo Download
Downloads one perfectly cropped passport photo at the exact pixel dimensions needed for digital submissions or online applications.
A4 Print Sheet Download
Downloads a ready-to-print A4 layout with multiple copies arranged correctly. Just print and cut - no resizing needed.
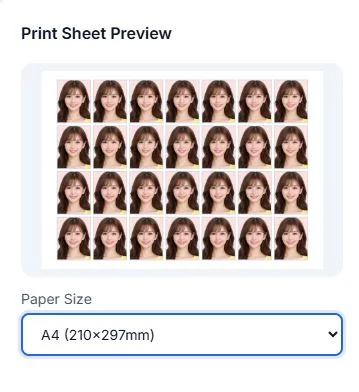
Printing Tips for Best Results
- - Use glossy or matte photo paper - regular printer paper makes photos look unprofessional and may be rejected
- - Print at 100% scale - do NOT use "fit to page" or "shrink to fit" in your print settings, as this will change the photo dimensions
- - Set print quality to "Best" or "High" (at least 300 DPI) for sharp, crisp results
- - Use a sharp pair of scissors or a paper cutter - clean edges look more professional
- - If you don't have a printer, save the file and take it to any print shop (Staples, OfficeMax, local print shops) - a single A4 color print typically costs $0.30-0.50
Pro Tip: For the best possible print quality, choose the "Download Both" option - you'll get the single digital photo (for online applications) and the A4 print sheet (for physical submissions) in one click.
Passport Photo Sizes by Country
Different countries have different passport photo requirements. Here are the most popular ones - VisaPicPro handles all of them automatically when you select your country:
| Country | Photo Size | Background | Guide |
|---|---|---|---|
| United States | 2 x 2 inches (51 x 51mm) | White | View |
| United Kingdom | 35 x 45mm | Light grey | View |
| India | 2 x 2 inches (51 x 51mm) | White | View |
| Canada | 50 x 70mm | White/Light grey | View |
| Schengen Visa | 35 x 45mm | White/Light | View |
| Australia | 35 x 45mm | White | View |
| Japan | 35 x 45mm | White | View |
| © Germany | 35 x 45mm | Light grey | View |
| China | 33 x 48mm | White | View |
| Brazil | 50 x 70mm | White | View |
Need a different country? Browse all 50+ country guides
8 Common Passport Photo Mistakes (and How to Fix Them)
I've seen thousands of passport photos go wrong. Here are the most common mistakes people make - and how to avoid them:
1. Using a Selfie
Front cameras distort facial proportions (wider nose, smaller ears). The angle is almost never straight-on. Fix: Use the rear camera with a timer or ask someone to help.
2. Shadows on Face or Background
Overhead lights create nose shadows. Standing too close to the wall casts a head shadow. Fix: Use natural window light, stand 6 inches from the wall.
3. Wrong Background Color
Cream, beige, or light yellow walls get rejected - they need to be white or very light grey. Fix: Use VisaPicPro's Background Remover to make it pure white.
4. Wearing Glasses
Many countries now ban glasses in passport photos, including the US (since 2016) and India. Even clear glasses cause glare and reflections. Fix: Remove all eyewear.
5. Printing at Wrong Size
Using "fit to page" shrinks the photo to wrong dimensions. Fix: Always print at 100% scale / "actual size." VisaPicPro's A4 sheet is already laid out correctly.
6. Photo Too Old
Most countries require photos taken within the last 6 months. Using an old photo is a common reason for application rejection. Fix: Take a fresh photo - it's free when you do it at home!
7. Cropping Too Tight
Some countries require a specific amount of space above the head and below the chin. Cropping too tight leaves no margin. Fix: Let VisaPicPro handle the crop - the AI knows the exact margins for each country.
8. Using Cheap Paper
Regular inkjet paper makes photos look dull and might bleed. Fix: Use glossy or matte photo paper. A pack of 50 sheets costs about $8 on Amazon - enough for hundreds of photos.
VisaPicPro vs Photo Studios: The Real Comparison
Let's lay it all out. Here's how making passport photos at home with VisaPicPro compares to going to a professional studio or pharmacy:
| Feature | VisaPicPro (Home) | Photo Studio/Store |
|---|---|---|
| Cost | $0 (Free) | $10-17 |
| Time Required | 5-10 minutes | 30-60 minutes |
| Retakes | Unlimited, free | Extra charge |
| Digital Copy | Always included | Often not provided |
| Privacy | 100% local (browser) | Photos stored on their systems |
| Available | 24/7, any device | Store hours only |
| Country Presets | 50+ countries | Usually limited |
| Print Layout | A4 sheet included | N/A (prints for you) |
| Watermark | None | N/A |
The only advantage of going to a store is convenience - you walk out with printed photos. But with VisaPicPro's print-ready A4 sheet, you can print at home in minutes or take the file to any print shop. The savings of $10-17 per set adds up fast, especially for families applying for passports together.
Frequently Asked Questions
Can I take a passport photo at home with my phone?
How do I make a passport size photo online for free?
How do I print passport photos on A4 paper at home?
Is it legal to make passport photos at home?
How much do passport photos cost at CVS, Walgreens, or Walmart?
What background do I need for a passport photo at home?
Do free passport photo tools add watermarks?
Can I use a selfie for my passport photo?
What are the most common passport photo sizes worldwide?
How long does it take to make a passport photo at home?
Ready to Make Your Passport Photo?
Join thousands of travelers who've made professional passport photos at home with a fast browser workflow and clear Free/Pro export options.
Create My Passport Photo - Free