You can do almost everything right and still get stopped by the photo upload screen. The photo looks fine on your phone, the face is visible, and the background seems plain enough. Then the portal rejects it, or worse, accepts it first and sends a photo problem notice days later. That usually means the image failed a practical detail that is easy to overlook: file size, pixel quality, crop room, background shadows, glare, or signs of editing.
Quick answer
If your online passport renewal photo is rejected, first export a fresh high-quality image, then check file size, format, crop, head position, background, lighting, glasses, and filters. Do not upload a screenshot, a photo sent through messaging apps, or a picture of a printed photo. If the face is blurry, shadowed, tilted, heavily retouched, or too close to the camera, retake it instead of trying to edit around the problem.
Think of this as a calm second check before you waste another attempt. We will sort out whether the issue is the file itself or the photo inside it, fix what can be fixed, and be honest about the cases where retaking the photo is faster than trying to rescue a weak image.
Why this problem is more common in 2026
More passport services now let applicants handle renewal online. In the United States, eligible routine renewals can be submitted through the official online renewal system, and the State Department has a separate digital photo upload guide for that flow. In the United Kingdom, GOV.UK tells online passport applicants that they need a digital photo and explains the minimum pixel and file-size rules. This is convenient, but it changes the job of the photo. The image is no longer just something you print and attach to paper. It becomes a data file that must survive browser upload checks, automated image tests, and final human review.
That is why the phrase "passport photo upload not working" often hides several different problems. One person may have a valid-looking image that is simply too small. Another may have a technically correct file that was compressed by a messaging app. Another may pass the upload screen but receive an email later because the background had shadows or the photo looked retouched. The right fix depends on which kind of rejection you are facing.
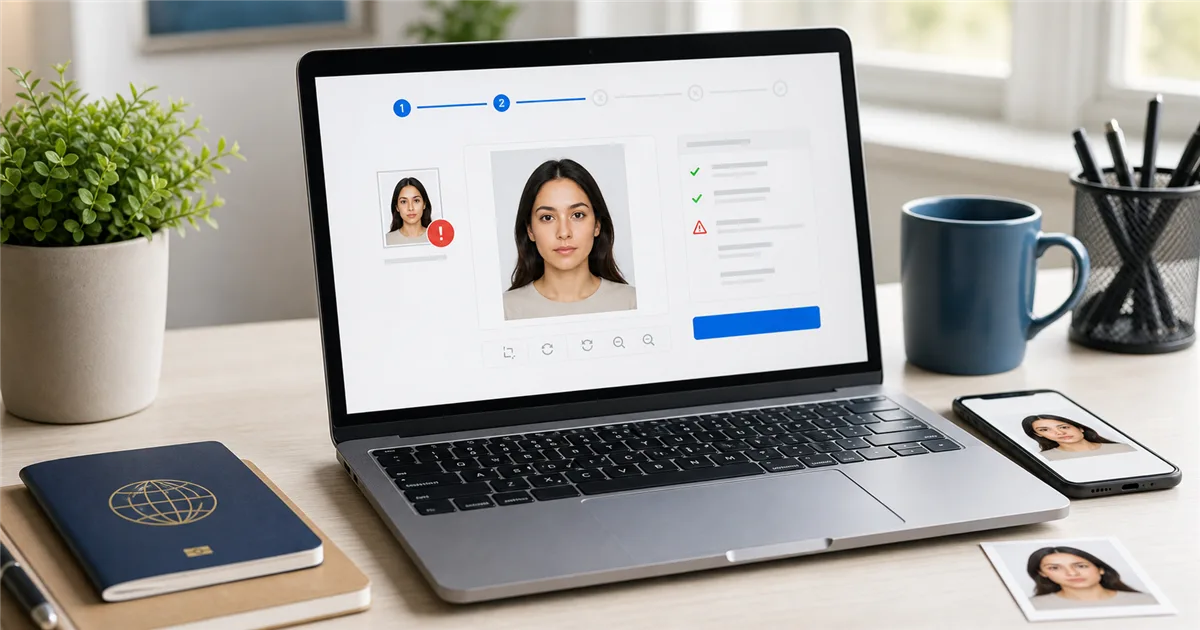
Start with the exact problem you are seeing
Not every rejection means the same thing. If the upload button does not respond, that is a browser or file-handling problem. If the portal says the file is too small or too large, that is an export problem. If it says the face, background, or quality is unacceptable, the image itself needs work. If you receive an email later, a person likely reviewed the photo and found something the automatic checker did not catch.
Before changing anything, write down the wording of the warning message or take a private note of it. Do not keep guessing with the same file. A photo that fails because of compression needs a different fix from a photo that fails because your head is too close to the frame.
First check: is it a file problem or a photo problem?
The easiest way to stop going in circles is to separate technical upload problems from visual photo problems. A technical problem means the website cannot use the file: wrong format, wrong size, corrupted download, blocked browser permission, or a file stored in the cloud that did not actually attach. A photo problem means the file uploads, but the picture does not meet the rules: the face is too small, the crop is awkward, the background is not plain, there is a shadow behind the head, glasses are causing glare, or the image looks edited.
The timing of the error tells you a lot. A message that appears immediately after selecting the file usually points to format, file size, or browser behavior. A warning after the image preview appears usually points to crop, face position, lighting, or background. A request for a new photo after submission should be treated as a manual review issue. Passing the upload screen is useful, but it is not the same thing as final approval.
Official digital photo rules that matter most
For U.S. online passport renewal, the State Department's digital photo page says you need to upload a digital photo and lists accepted formats including JPG, PNG, HEIC, and HEIF. It also says the file should be between 54KB and 10MB, the photo must be in color, taken within the last six months, and should not be changed with filters or retouching tools. The same guidance warns that the photo tool performs a basic check, but an employee can still review the photo later and request a new one if there is an issue.
For UK online passport applications, GOV.UK says a digital photo is needed for online applications. The digital photo must be clear, in focus, in color, unaltered by computer software, at least 600 pixels wide and 750 pixels tall, and between 50KB and 10MB. It must show you alone, against a plain light-colored background, with no shadows on your face or behind you.
Those rules reveal the pattern behind many rejections. Government portals are not only checking whether your face is visible. They are checking whether the file is suitable for identity verification. That means the photo has to be technically clean, visually honest, recent, and easy to inspect.
12 reasons an online passport renewal photo gets rejected
1. The file is too small, too large, or damaged
File-size limits are easy to miss because your phone gallery does not warn you when an image is unsuitable for an official upload. A tiny file may look acceptable on a small screen but fall apart when inspected around the eyes and jawline. A very large file may time out or exceed the portal limit. A damaged file can happen after an interrupted transfer or a bad export from an editing app. Re-export from the original photo at high quality, then check the file size before uploading again.
2. The image was sent through a chat app
Messaging apps often shrink photos to save bandwidth. They can reduce pixel dimensions, strip metadata, and add compression noise that is hard to see until the portal checks the image. If a friend took your photo, ask them to send it as the original file or as a document attachment rather than as a compressed chat image. The official U.S. guidance specifically warns against sending the image by text message because it can make quality worse.
3. You uploaded a screenshot
A screenshot feels convenient, but it is a poor source file. It can include empty margins, browser borders, phone interface bars, hidden compression, or a lower resolution than the original image. It can also confuse crop tools because the real face is surrounded by artificial space from the screen. Upload the exported passport photo file, not a capture of the preview.
4. The crop is too tight or too loose
Online upload tools often let you crop after upload, but the original file still needs enough room around the head and shoulders. If your face fills the entire frame, the portal may not be able to position the head correctly. If you are too far away, the face becomes too small and the background dominates the image. A good source photo includes the full head, neck, shoulders, and a little extra room around the face so the official crop tool has space to work.
5. The background is not plain enough
A wall that looks plain in your room can still fail if the camera captures texture, picture frames, corners, shadows, curtains, or color gradients. Passport photo systems are especially sensitive around the head and shoulders, where shadows and background edges can interfere with face detection. Use a white or off-white wall, stand several feet away from it, and avoid standing directly against the wall. If the wall is not suitable, hang a clean sheet and light it evenly.
6. There are shadows on the face or behind the head
Shadows cause a lot of rejections because they hide the exact features reviewers need to see. A tiny soft shadow under the nose is not the issue. The problems are darker bands across the eyes, uneven cheeks, a heavy jaw shadow, or a clear outline of your head on the wall. Editing rarely fixes this cleanly. Better light does. Face a window, avoid overhead light, and stand away from the wall so your body does not throw a hard shadow behind you.
7. The photo is blurry, grainy, or pixelated
Blur can come from camera shake, missed focus, low light, digital zoom, or heavy compression. Grain appears when the phone raises ISO in a dark room. Pixelation appears when a small image is enlarged. Passport reviewers need to see the eyes, mouth, nose, face outline, and skin detail clearly. If the original is soft, retake it in brighter light with the rear camera. Do not try to rescue a blurry photo with sharpening filters; that can make the image look artificial.
8. Glasses, glare, or reflections hide the eyes
Many passport services strongly prefer or require photos without glasses unless there is a medical reason. Even when glasses are allowed, glare, tinted lenses, thick frames, and shadows over the eyes can lead to rejection. If you do not have a required medical reason, remove your glasses before taking the photo. This is one of the simplest ways to avoid delays.
9. The face is angled, tilted, or expression is wrong
A passport photo should not have the energy of a profile picture. Face the camera directly, keep both eyes open and visible, and keep the mouth closed. Do not lift the chin, turn one shoulder, or tilt your head because it feels more flattering. A plain, balanced photo is much safer than a stylish one.
10. Filters or beauty tools changed your appearance
This is an easy mistake because many phones apply beautification, smoothing, HDR, and automatic processing by default. Official guidance warns against filters, retouching, and software changes that alter appearance. Removing a background or resizing a photo is different from changing the face. Avoid skin smoothing, face slimming, eye brightening, makeup filters, background blur, and AI portrait effects.
11. The photo is too old
Online renewal portals may not know the exact capture date, but reviewers can reject a photo that appears outdated or does not match your current appearance. The U.S. page requires a recent photo taken within the last six months, while GOV.UK says a new passport needs a new photo and digital photos should be recent according to its rules. If your hairstyle, facial hair, weight, or face has changed noticeably, take a new photo.
12. You used a printed photo as the source
Taking a picture of a printed passport photo is usually a bad shortcut. It can create glare, paper texture, printer dots, uneven perspective, and reduced sharpness. Scanning may also add artifacts. A digital renewal photo should come from a camera source file or a properly exported digital passport photo, not from a printed copy unless the official service specifically allows that path.
The 10-minute fix workflow
Before uploading the same failed image again, take ten minutes and work from the source file. Find the original photo from the device that took it. If all you have is a compressed copy from a message thread, ask for the original. Open the image at full size and zoom in around the eyes. If the eyes are soft, do not spend time resizing it. Retake the photo. If the face is sharp, look at the background next. Texture, objects, hard shadows, or a visible corner behind the head are signs that the photo needs a cleaner background or a retake.
Once the image quality is good, handle the technical side. Confirm the file type and size. If your portal accepts several formats, JPG is often the safest everyday export because almost every system understands it. Save at high quality, not maximum compression. Crop only as much as the application asks you to crop, and leave room around the head and shoulders if the portal has its own crop tool. Rename the file simply, for example passport-photo.jpg. If the button still does not work, try a different modern browser before assuming the photo is the problem.
If you use VisaPicPro, start with the best original photo, choose the correct country or document type, and download the formatted digital file. Use it as a formatting helper, not as a way to disguise a poor source image. A good tool can solve crop, size, background, and export problems. It cannot make a dark, blurry, tilted selfie into a reliable identity photo.
Retake instead of editing when:
- The eyes are blurry or hidden by glare.
- There is a strong shadow across the face.
- Your head is turned, tilted, or cropped off.
- The image came from a screenshot or a compressed chat app copy.
- A beauty filter, AI portrait mode, or smoothing effect changed your appearance.
How to take a better digital passport photo with a phone
The best phone setup is boring, which is exactly what you want. Use the rear camera instead of the selfie camera. Ask another person to take the photo. Stand in front of a plain white or off-white background, but leave a few feet between your back and the wall. Face a large window or another soft light source. Keep the phone at eye level. Turn off portrait mode, background blur, beauty mode, and filters.
Take more than one shot. In each one, keep your shoulders square, your face straight, eyes open, mouth closed, and hair away from your eyes. Include the top of your head, the bottom of your shoulders, and extra space around the face. Then inspect the best shot at full size. If it does not look trustworthy enough for an official ID document, retake it while the setup is still in place. That is faster than fighting the upload page later.
U.S. online renewal photo notes
For U.S. users, start only from the official online renewal page at Travel.State.Gov or the official renewal portal it links to. The State Department warns applicants to avoid unofficial online renewal sites and to check that the site ends in .gov. For the photo itself, prepare a recent color image, avoid glasses, use a white or off-white background, and do not use filters or retouching tools. The digital upload page allows common camera formats and gives a file-size range, but the later review still matters.
If the U.S. upload tool rejects your image, read the error carefully. A file-size message is not solved by changing the background. A crop or face-position message is not solved by converting PNG to JPG. A quality warning is not solved by enlarging a small image. Fix the actual problem, then upload a fresh export. If the application later asks for a new photo, do not reuse the same file unless the email clearly says the problem was only technical.
UK online passport photo notes
For UK applicants, GOV.UK says online renewal needs a digital photo. The page also explains that photos from a booth or shop are more likely to be approved than photos taken on your own device, but you can still take one yourself during the application. The important technical rules are straightforward: clear and in focus, in color, unaltered by software, at least 600 pixels wide and 750 pixels tall, and between 50KB and 10MB. The visual rules are equally important: no other people or objects, a plain light-colored background, clear contrast, no red eye, eyes visible, and no shadows on the face or behind you.
A common UK mistake is cropping the image too tightly before the application. GOV.UK says if you use your own device, include your head, shoulders, and upper body and do not crop it yourself because the service will crop it for you. In plain language: give the portal enough image to work with. A tight headshot may look neat, but it can fail because the official crop system cannot verify the full positioning.
When the upload button itself does not work
Sometimes the photo is fine and the website is the problem. If the upload button does nothing, first refresh the page and try again. If that fails, use a modern browser such as Chrome, Edge, Firefox, or Safari. Disable aggressive ad blockers or privacy extensions for the official portal only. Try uploading from a computer instead of a phone if the mobile browser keeps failing. Make sure your internet connection is stable. If the file is stored in cloud storage, download it to the device first and upload the local copy.
Also check the file name. Some older upload systems behave badly with unusual characters, emojis, very long names, or multiple periods. Rename the file to something simple like passport-photo.jpg. This should not be necessary on a well-built portal, but it removes one more possible source of failure.
Final pre-upload checklist
- The file opens normally on your device and is not a screenshot.
- The file size is within the official range for your application.
- The file format is accepted by the official portal.
- The photo is recent, in color, and shows your current appearance.
- Your face is sharp, centered, and directly facing the camera.
- Your eyes are open, visible, and not covered by glare or hair.
- The background is plain, light, and free of shadows or objects.
- No filters, beauty mode, face smoothing, or AI portrait effects were used.
- The crop includes enough head and shoulder area for the portal to process.
- You are uploading through the official government renewal website.
How VisaPicPro can help without over-editing
A passport photo tool is most useful when your source image is already strong and the final file needs to match a specific document format. VisaPicPro can help with sizing, crop, background cleanup, and export, so you do not have to guess dimensions manually. It is especially helpful when the original camera image is clear but the upload failed because the crop, background, or file export was wrong.
What you should avoid is changing your identity features. Do not reshape your face, remove natural marks, brighten only the eyes, smooth skin heavily, or make the image look like a social media portrait. The strongest passport photo is plain in the right way: clear, direct, recent, and easy for a reviewer to verify.
Create a clean digital passport photo
Upload your best original photo, choose the correct country or document type, and download a properly sized digital file. Keep the original honest and let the tool handle the technical formatting.
Create Passport PhotoWhat to do if the application already rejected it
If you have already submitted the application and later receive a photo problem notice, do not panic and do not send the same image again. Read the notice carefully. If it mentions lighting, background, glasses, face position, or quality, retake the photo. If it mentions file format or upload instructions, export a new version from the original source. Keep a copy of the notice and follow the official response method only. Do not pay an unofficial company that claims it can "fix" or "speed up" an official application unless you fully understand what service it is providing.
For urgent travel, check official processing-time and expedited-service guidance from your government's passport agency. A better photo prevents avoidable delay, but it does not override the passport office's processing queue. The practical goal is to remove the photo as a reason your application gets held up.
Official references
Passport requirements can change, so always confirm the latest details on the official pages for your country before submitting. The most relevant official pages for this guide are:
- U.S. State Department: Uploading a Digital Photo
- U.S. State Department: Passport Photos
- U.S. State Department: Renew Your Passport Online
- GOV.UK: Get a Passport Photo
- GOV.UK: Renew or Replace Your Adult Passport
FAQ
Can I use HEIC from my iPhone for online passport renewal?
For U.S. online renewal, the official digital photo page lists HEIC and HEIF among accepted file formats. Some other portals may prefer JPG. If your upload fails with HEIC, export a high-quality JPG and try again, but do not reduce the image so much that the face becomes soft or pixelated.
Why did the portal accept my photo and then reject it later?
Automatic upload tools usually perform basic checks. They may verify format, size, face detection, and obvious crop issues. A human review can still catch problems such as subtle shadows, unacceptable glasses, an altered appearance, or a background that does not meet the rules. Treat the later notice as the more important decision.
Can I remove the background from a passport photo?
You can prepare a plain compliant background when the original photo is otherwise clear and honest, but do not alter the face or create an unrealistic cutout. The safer option is to retake the photo against a better background. Use background tools carefully and inspect the edges around hair, ears, shoulders, and clothing before uploading.
Is a white background always required?
Not always, but many passport services require white, off-white, or plain light-colored backgrounds. The U.S. guidance refers to white or off-white. GOV.UK refers to a plain light-colored background with clear contrast. If you are unsure, use a clean white or off-white background because it is the safest common choice.
Should I pay for a booth photo instead?
A booth or shop can be useful if you keep failing with phone photos, especially for UK digital photo codes. But many users can create an acceptable digital photo at home if they use good light, a plain background, and a high-quality original image. Paying is not the important factor. Compliance is.